The Shopping basket page contains the items selected by the user during navigation in any catalogue available on the ePER Home Page (Parts, Accessories, etc.).
This page can be accessed by clicking on the "Basket" icon present in the main menu:
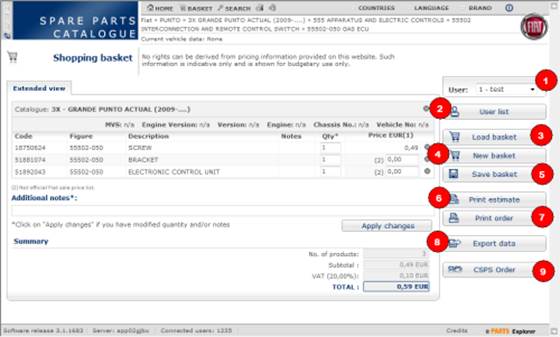
Fig. 45: Shopping basket
Parts in the basket are grouped by vehicle (the one selected when the product was inserted).
Each product is inserted in the basket with a default quantity of 1. To change
the quantity use up/down arrows to increase/decrease quantity by 1. Then click
on the “Apply changes” button.
To remove a product from the basket click the ![]() icon at the side of the actual product.
icon at the side of the actual product.
To remove an entire group of products click the ![]() icon in the top right corner of the
container box.
icon in the top right corner of the
container box.
To add notes (they will be printed in the order), use the "Additional
notes" field and click the "“Apply changes” button.
The right side section of the page contains the following buttons (numbers
refer to callouts in the above picture) :
N.1: Username (“User” in the figure)
The current basket can be associated with a user from those defined in function No. 2 (User list).
N.2: User List ("User list” in the figure)
This button activates a popup window where it is possible to enter or show the users in a dealership/workshop. It is possible to insert a code and a name/surname for each user.
N.3: Load Basket ("Load basket" in the figure)
This button activates a popup window containing the list of baskets previously saved by the user. It is possible to select a previously saved basket and load its content in the current session. For each basket previously saved the system shows some information including the saved date and the number of products.
N.4: New Basket (“New basket” in the figure)
This button creates a new empty basket replacing the current one.
N.5: Save Basket (“Save basket” in the figure)
This button makes it possible to memorise the current basket so that it can be recalled later on using button no. 3. During the saving the system asks you to enter a name or identification for the actual basket.
N.6: Print Estimate (“Print estimate” in the figure)
By clicking on this button the system create and show a document in pdf format, in a new window, with the basket content.
N.7: Print order (“Print order” in the figure)
By clicking on this button the system will display a document in pdf format, in a new window, containing a single list of all products in the basket with their description and quantities.
Unlike function no. 5, this type of printout does not contain groups of products by vehicle or additional details of each product.
To use this function, remember that it is necessary to have installed Acrobat Reader.
N.8: Export Data (“Export data” in the diagram)
This function makes it possible to export the contents of the basket to a file on the user PC so that the file can then be used, if necessary, to import the contents of the baskets into another application in use at the dealership (e.g. "DMS"):
To proceed:
» Click the “Export data” button. The system will show a request window with various buttons.
» Click the “Save” button. The system will show a new window for selecting a local file where to save the contents of the basket.
» Select the path and the name of the file to be saved, for example "c:\basket.txt", and confirm using the dedicated button
The file produced by this function is in a text format and contains one line for each product in the basket.
Each line contains the following fields, separated by the character "|" (pipe):
PRODUCT CODE | PRODUCT DESCRIPTION | LIST PRICE
N.9: CSPS Order (“CSPS Order” in the figure)
If present, this button makes it possible to start a web session for submitting an order to the CSPS system. The content of the basket is automatically transferred to the CSPS system and then a CSPS page is displayed for finalizing and confirming the order in CSPS.